Original Article – https://www.loveproperty.com/gallerylist/92128/the-ultimate-diy-hacks
Make DIY disasters a thing of the past

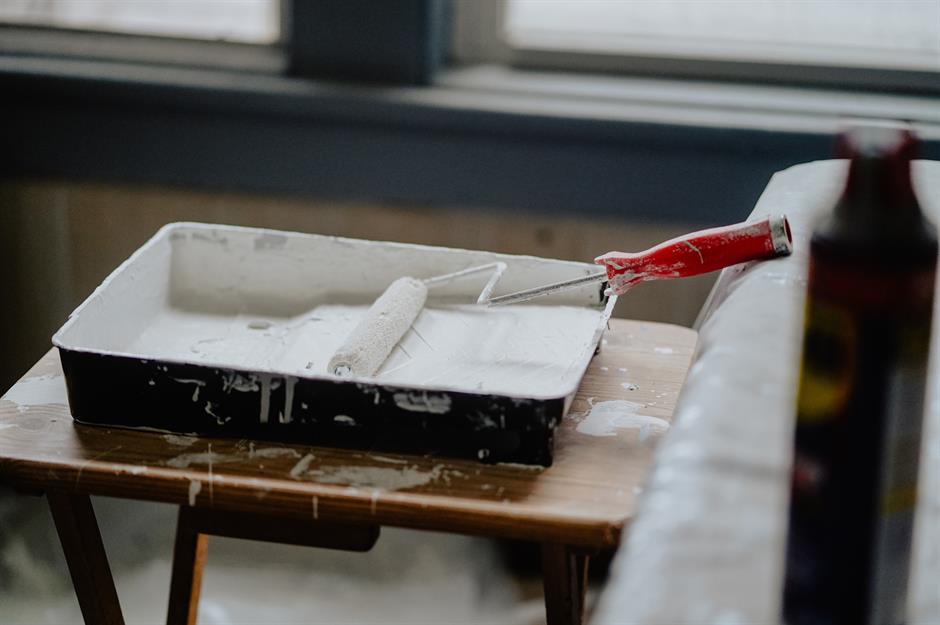
Fit For The Job / Amazon
Perfect your home improvement skills with our round-up of the best top tips and crafty shortcuts you’ll wish you’d known sooner. From simple paint tricks for touch-up jobs to industry secrets from the professionals, check out these genius DIY hacks that will change your decorating life forever. You can thank us later!
Paint decking with a broom
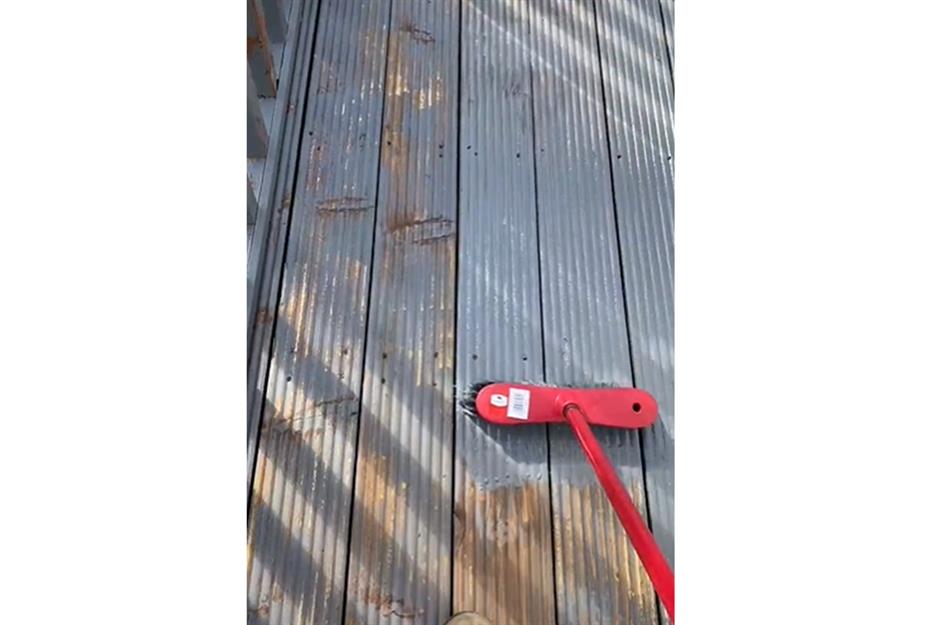
@dad.dancer / TikTok
Painting the decking is a weekend DIY job that can make a big difference to your garden terrace but it can be back-breaking work. Social Media user @dad.dancer took to TikTok to prove how he got the job done in record time with a broom which resulted in minimal bending.
Protect door knobs with Vaseline
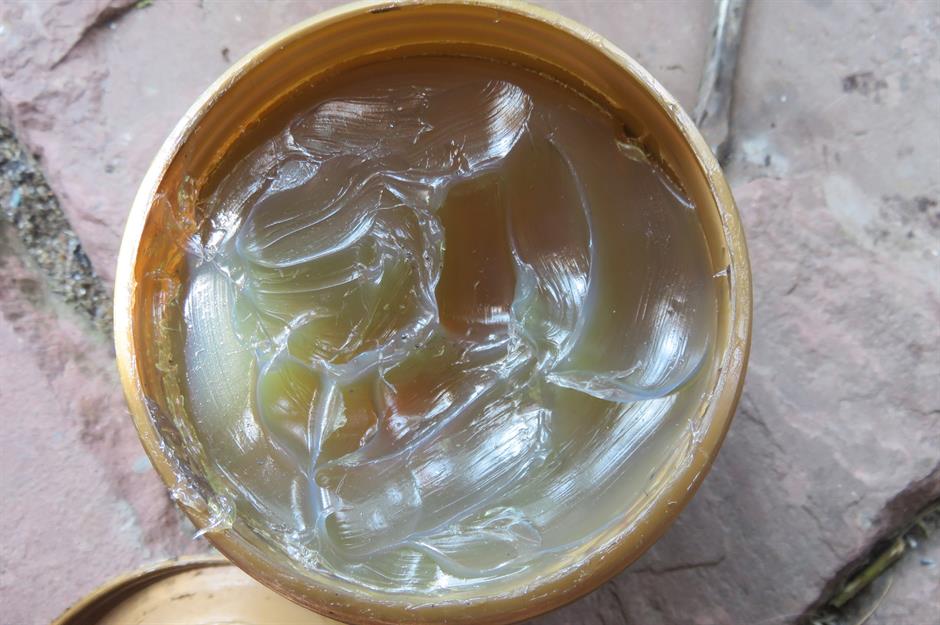
AppleDK / Shutterstock
Painting doors with intricate features can be tricky as without a flat surface masking tape can fail to fully protect areas. Here’s where petroleum jelly can be a saving grace. Before painting use a cotton bud to cover any metal fixtures such as handles, plates, keyholes and lock mechanisms with plenty of Vaseline. Try not to paint over the metal areas but should a mistake be made simply wipe off the jelly with a cloth and the paint will come with it.
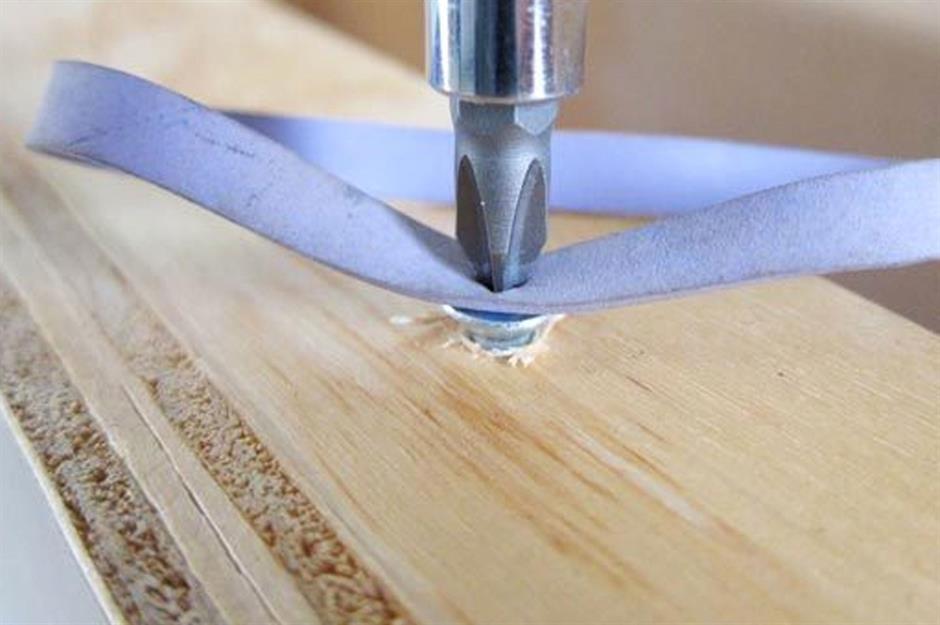
Use ring pulls to hang art
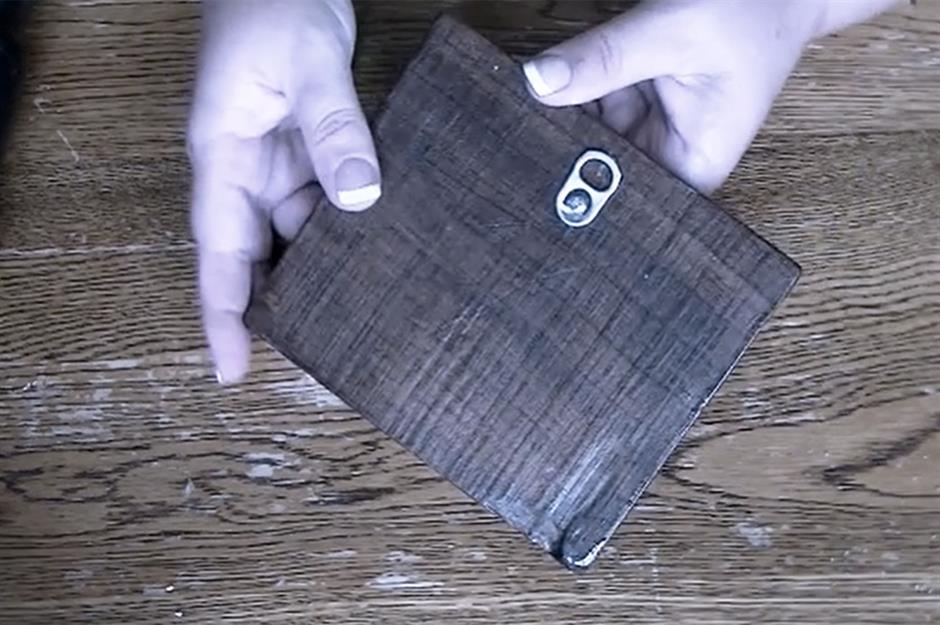
UpcycledStuff / YouTube
Before you throw your fizzy drinks can away pull off the ring pull first as it has many uses. One, in particular, is to use it as a handy ready-made hook to hang art and crafts on walls with. Centre the tab on the back of the frame or artwork, then drill a screw into the smallest hole of the tab to secure it onto the frame. Finally, slightly lift and bend the tab outwards so it’s easier to hang onto the wall. UpcycledStuff shows how it’s done here.
Heavy items need wall anchors
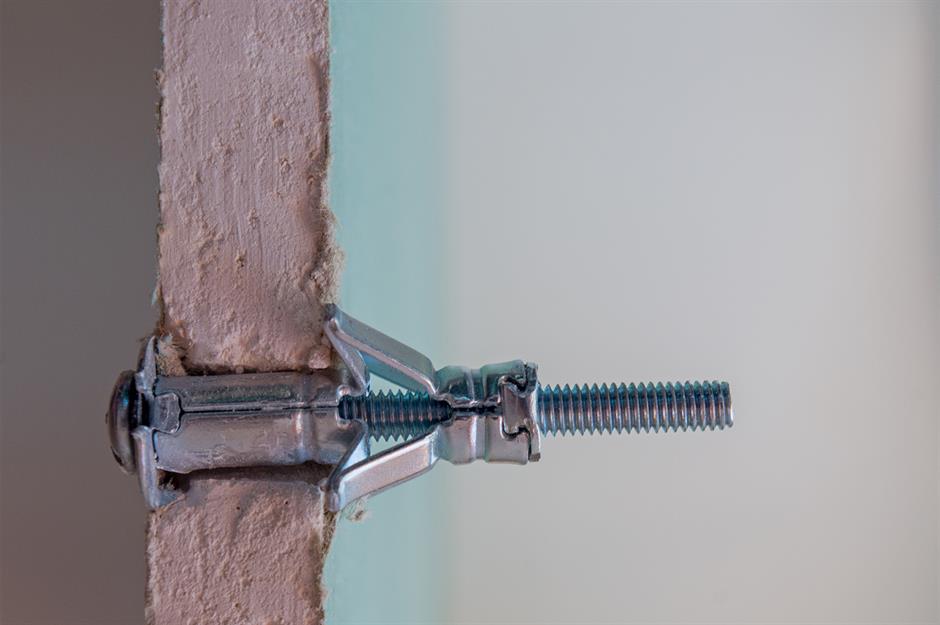
ANDY RELY / Shutterstock
Need to hang a heavy mirror or piece of art on a plaster wall? Don’t attempt it without first adding wall anchors or you could end up with a few large holes or worse still a serious accident. Matt Michaels a spokesperson from Lowe’s Home Improvement explains why. ‘Because drywall is too weak to hang things from, a drywall anchor is necessary. The anchor essentially allows you to insert screws into the wall without causing the soft drywall to crumble around it’.
Wrap rollers in clingfilm
Karl Solano / UnSplash
Need to keep your roller moist overnight? Painting and Decorating experts at Toolstation.co.uk explain what to do. ‘If you’re finishing for the day and don’t fancy washing your rollers, simply load them up with paint and then roll them up in plastic clingfilm works a treat. Leave them somewhere shady and they won’t dry out overnight.’
Fill holes in walls with brick dust
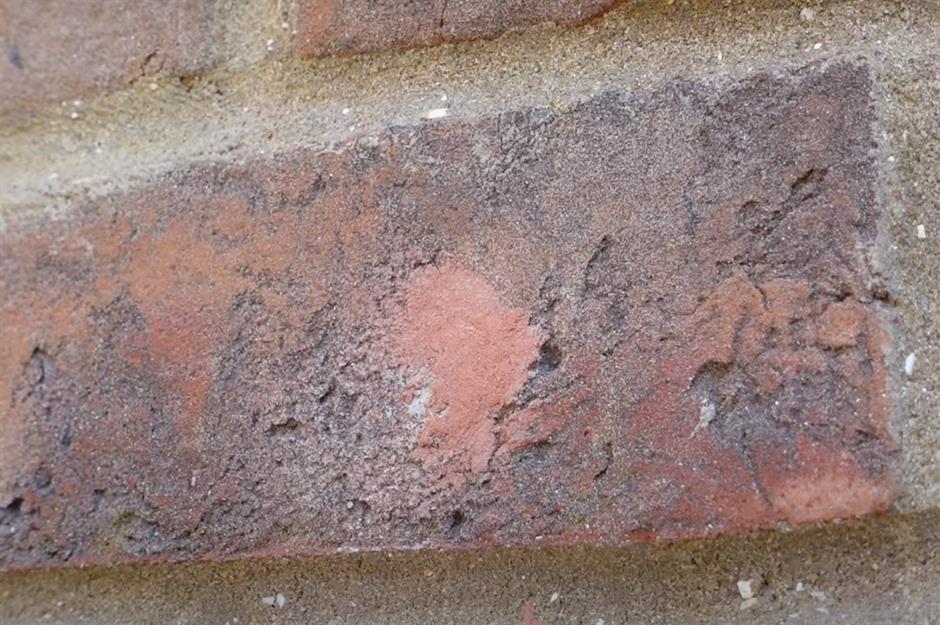
The DIY Guy / YouTube
Here’s a great tip from The DIY Guy to cover up old holes in brick walls. First, make the hole slightly bigger using a drill but be sure to save the red brick dust. Then, fill the hole with motor repair cement. Whilst still tacky dab the red dust over the grey residue. Hey presto—a perfectly camouflaged and filled hole.
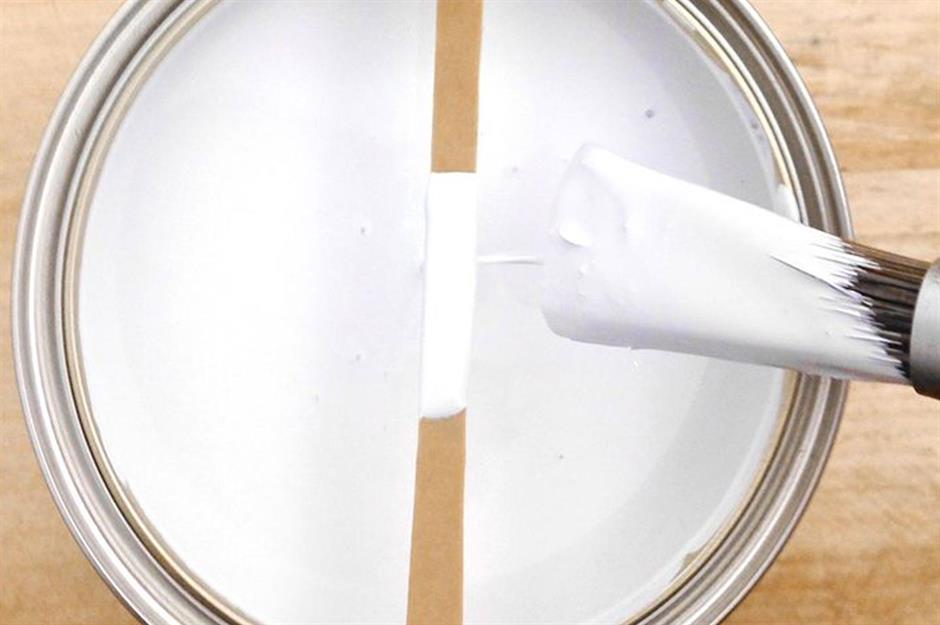
Make lines crisp and perfect

Yuriy Golub / Shutterstock
A two-toned wall looks super stylish right now. But the wall paint technique has to have a clean line for a professional finish. Here’s the hack: paint over the edge of the tape with the colour already on the wall to ‘seal’ the tape. Once that coat dries, apply your new colour on top. The results will be much crisper!
Tape a disposable cover to the floor
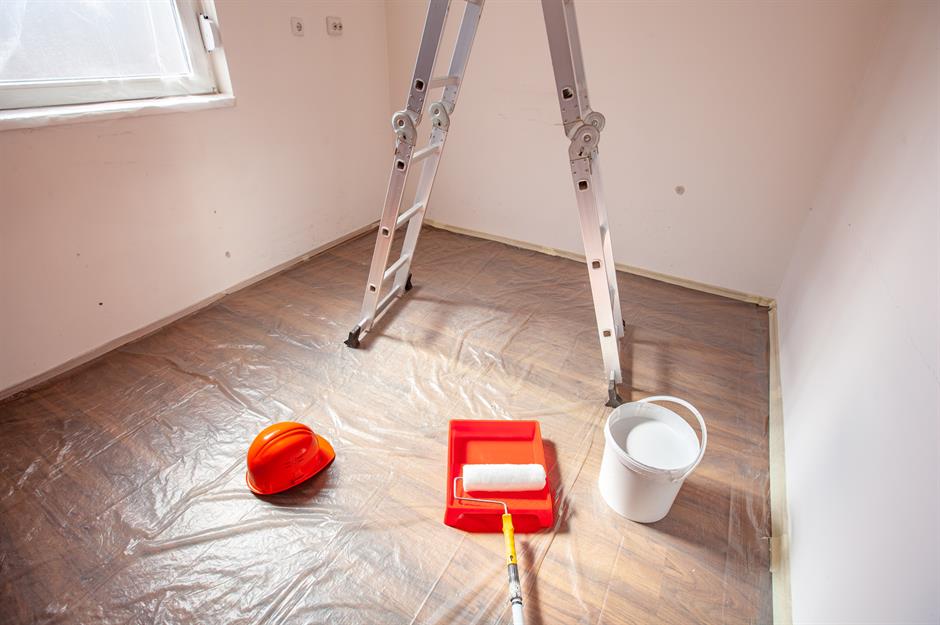
Superstar / Shutterstock
Save time and protect floors fully by covering floors with an inexpensive plastic drop cloth. Make sure it’s paint protected tight by taping the edges to skirting boards. When you are done simply grab all four corners to pick up the splashed cover in one go and it throw away.
Paint banisters with a sock
Furniture And Choice
Here’s a genius time saving-trick to transform your hallway. It’s super handy for fiddly hard-to-reach areas such as staircases. First, put on a plastic glove. Then slip an old but clean sock over the top. To paint the method then requires dipping your sock-covered hand into the paint and simply ‘hand’ painting by using the glove as a brush. Wrap your whole hand around the spindle to get full coverage.
Always map out a gallery wall layout
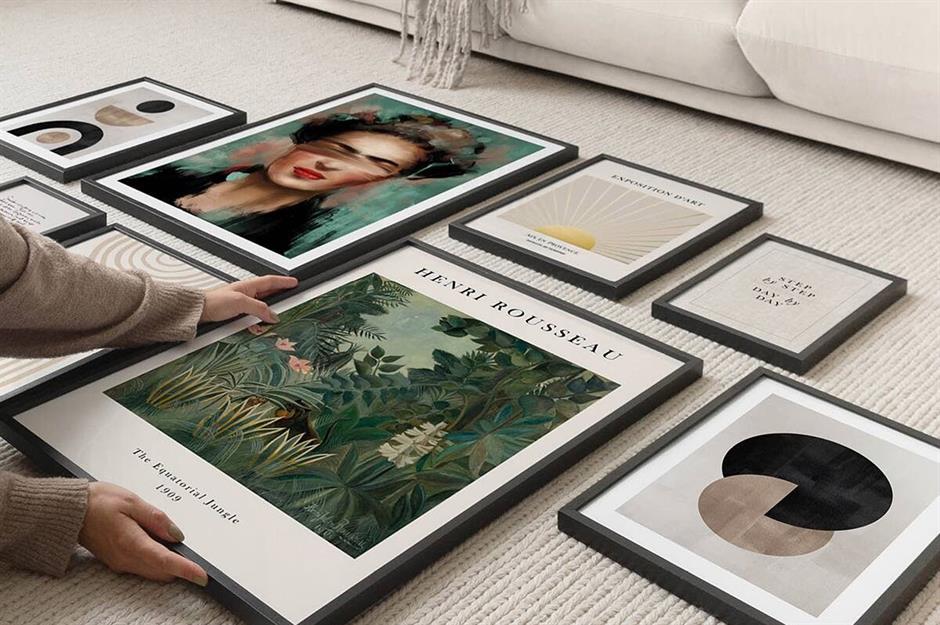
Desenio
Create a gallery wall of your dreams with perfect frame placement. First experiment by placing the prints on the floor. Then, take the sheets of paper that came out of new frames and use them as the template for planning your layout. Arrange them on your wall using washi tape.
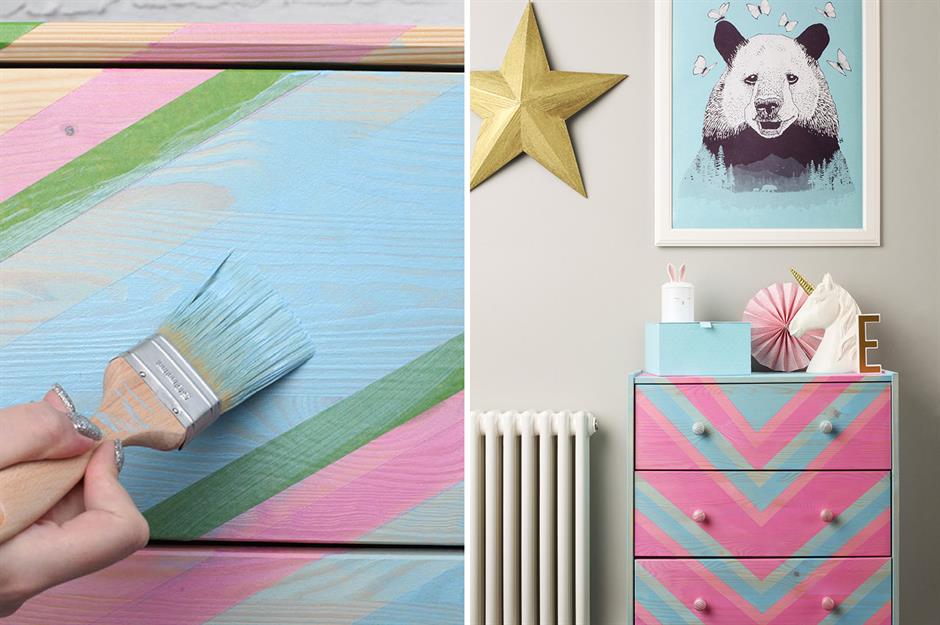
Make your own chalk paint
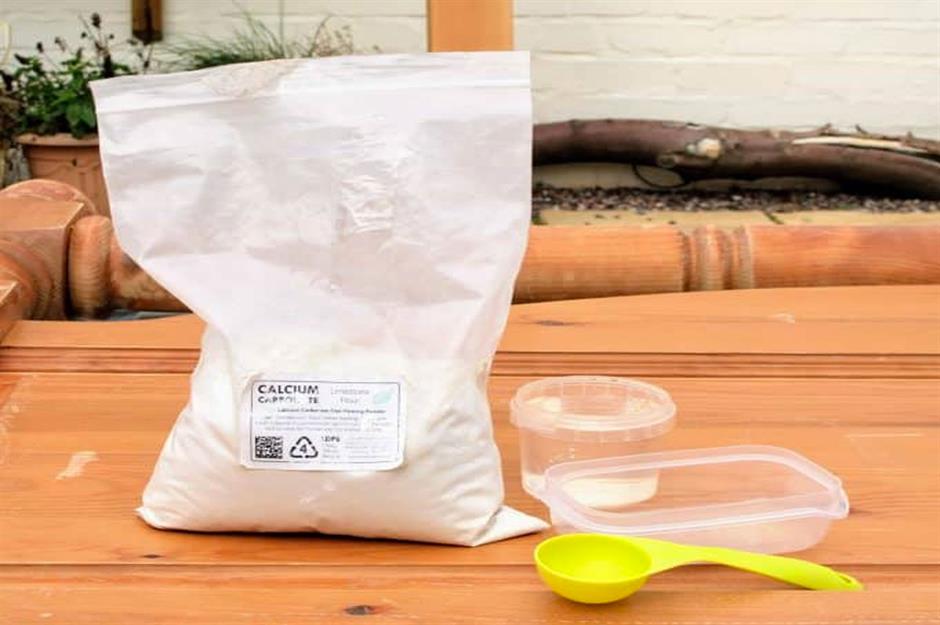
The Carpenter’s Daughter
When it comes to upcycling old furniture, our go-to has to be chalk paint. There’s no need to prime or sand, meaning you can get straight down to the creative stuff! But, while chalk paint can create stunning results, it can be expensive. DIY blogger The Carpenter’s Daughter has an effective formula for making your own at a fraction of the price of well-known brands. Vikkie Lee mixes regular emulsion paint, calcium carbonate and water to make homemade chalk paint, and promises the quality will be just as good as your favourites. Why not give it a try?
Roll wallpaper outside in
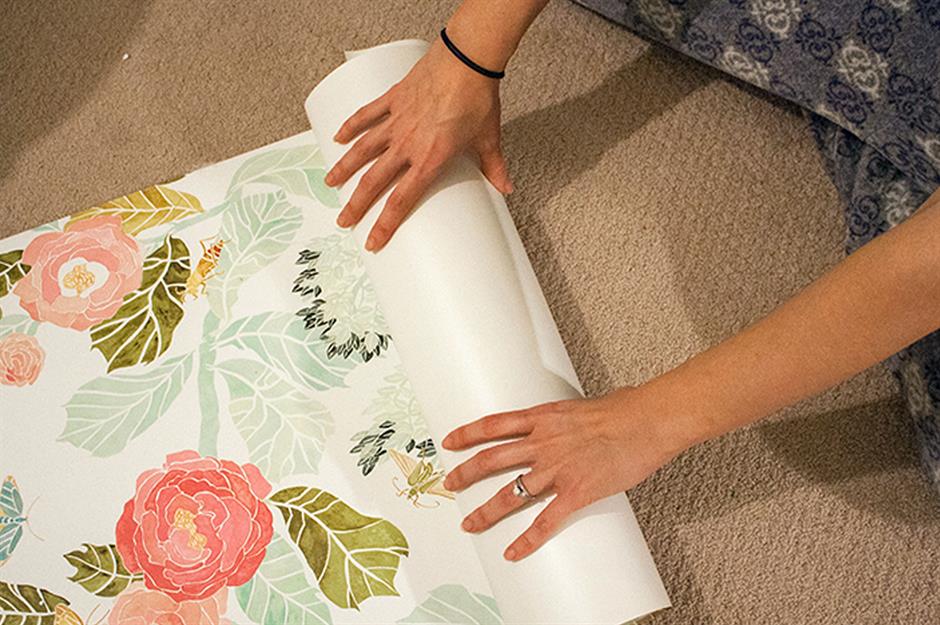
View Along The Way
Invested in some fancy new wallpaper to add a little wow-factor to your decor? Make the job easier by taking the wallpaper out of its roll a few days before installation and re-roll it the opposite way. The paper will then lie flat as you work. Top tip: before you begin, make sure all the rolls have the same batch number printed on the label, as colours can vary. This floral wallpaper used by View Along The Way is pretty and pre-pasted, making hanging even easier!
Apply wallpaper paste with a roller
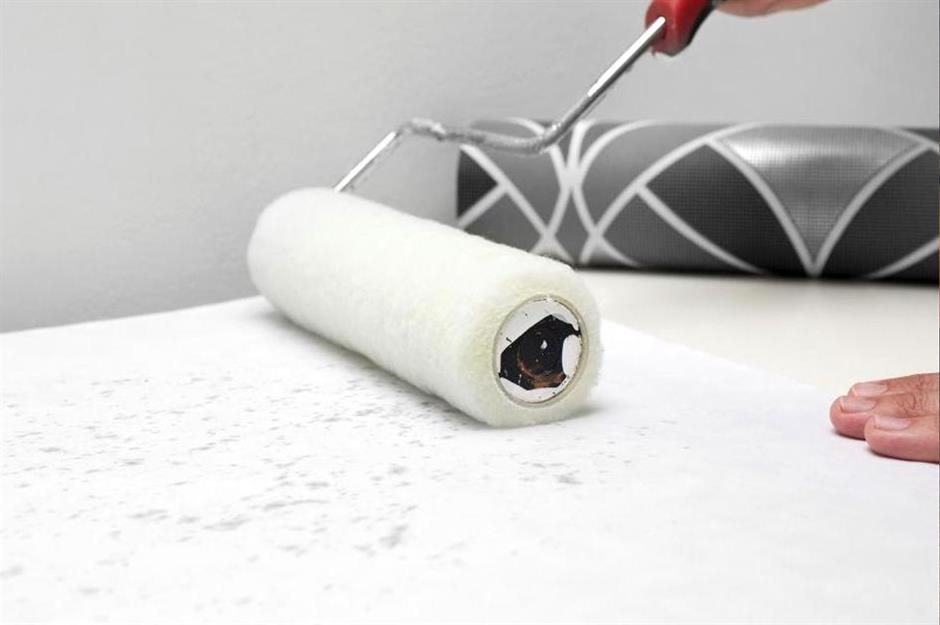
Maydos
When applying adhesive to your wallpaper use a paint roller instead of a sponge or brush. The paste will spread more evenly and consistently. Some papers now require you to paste the wall before hanging, which means the paper weighs less and doesn’t get soggy, so there’s less chance of tearing. If this is the case for your product, use the roller, only this time on the wall!
Place a rubber band over your paint can
Dulux
Fed up with messy paint tins and paint dripping on the floor? A simple rubber band stretched across the middle of the paint can will allow you to wipe excess paint off the brush, allowing it to fall back into the container, rather than dripping down the sides. This DIY decorating hack is super simple yet so effective!
Line a paint tray with a plastic bag
Photographee.eu / Shutterstock
Question: how do you paint a room while keeping your paint tray like new? Answer: simply cover the tray with a plastic bag before you pour in the paint. When you are finished just remove the bag and throw it away. You can also use heavy-duty cling film or foil. Your paint tray will remain as clean as a whistle underneath and you won’t need to wash out any more paint trays!
Use a sticky note as a dust collector
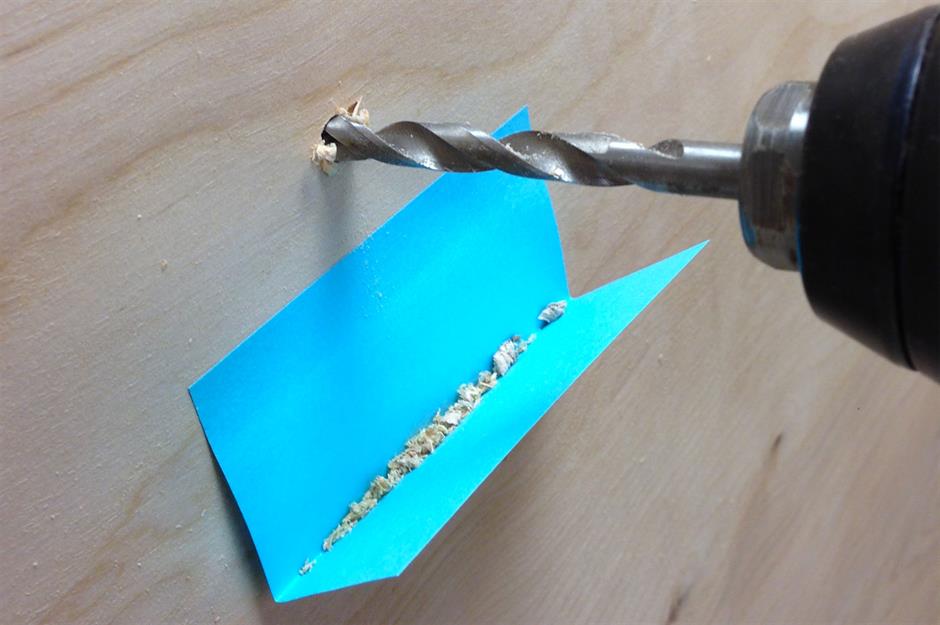
Acme Tools
The next time you need to drill holes in any wall or surface stick a folded sticky note underneath. The fold will catch the dust before it falls onto the floor. For bigger jobs, tape a cut cardboard cereal box to the wall or ask someone to hold a dustpan underneath as you drill. Simple!
Make wood filler with sawdust
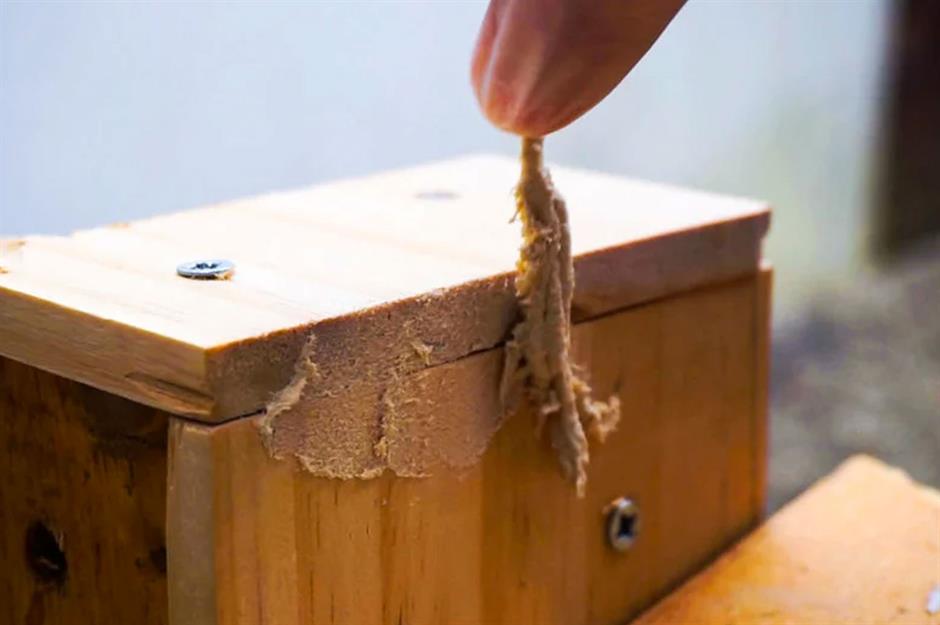
Instructables / Handy_Bear
Remember that sawdust you saved on the sticky note? Use it to make your own wood filler to smooth out any annoying gaps. All you’ll need is some wood or craft glue to work as a binder. If the sawdust comes from the same workpiece, the colour with be similar to the original surface. Take a look at the Instructables tutorial by Handy_Bear for a full guide.
Fix sticky drawers with wax

The Real Milk Paint Co
Solid wood furniture is so appealing but over time, warping and wear and tear can take its toll and make drawers hard to open. There is, however, an easy solution to get them running smoothly again. Pull out the drawer and using a clean cloth apply a thin layer of wax to the glide tracks. You can buy specially formulated furniture wax or for a quick-fix, candle wax will do. For a more in-depth how-to check out The Real Milk Paint Co’s blog.
Hammer nails with a clothes peg
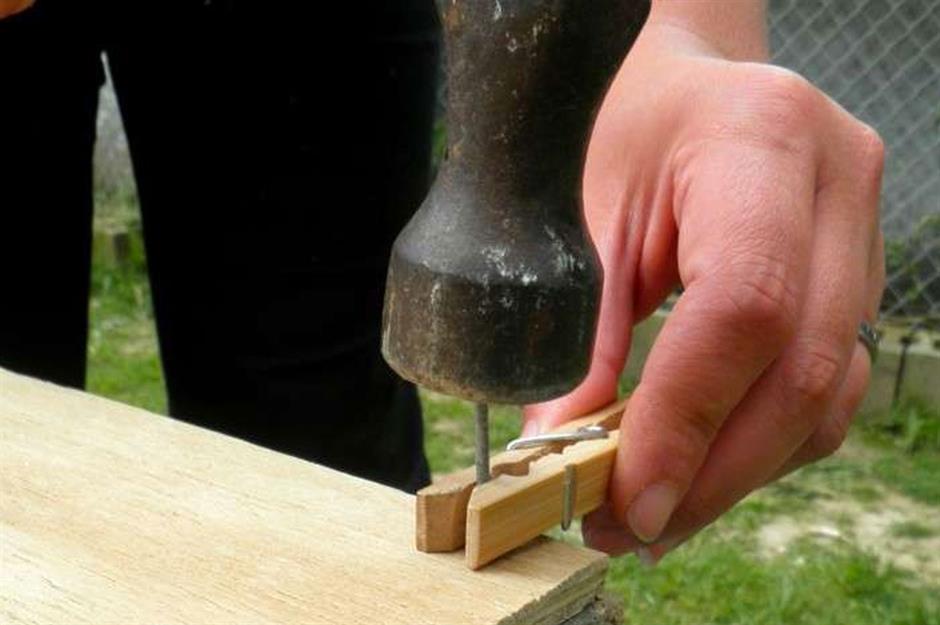
NZ Ecochick
Tackling a weekend DIY job? If you’re not a pro, using your hand to steady nails can lead to hammer injuries. Keep your fingers safe by holding the nail in place with a wooden peg. That way your fingers can remain well clear and the nail stays in place, as NZ Ecochick demonstrates here. This trick also works with a comb in place of a peg.
Fill a bucket with a pool noodle
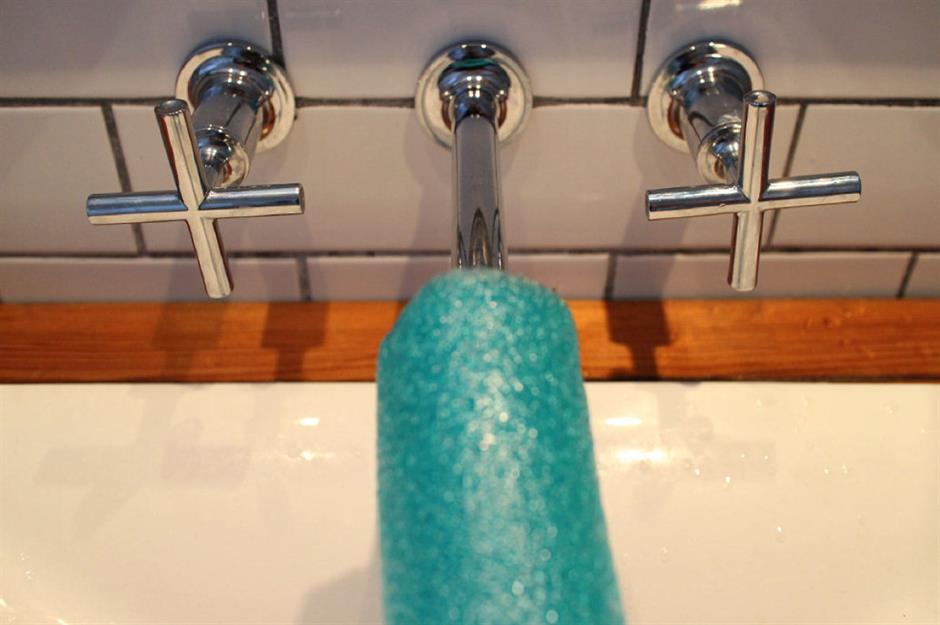
Instructables
DIY jobs often need water but how do you fit a large bucket into a small sink? Those clever DIYers at Instructables have a smart idea involving a swimming aid! Avoid having to lift a heavy water-filled bucket by using a pool noodle as a hose. Slide one end over the tap and point the other end into the bucket and turn the tap on – it’s that simple!
Make a magnetic wrist band
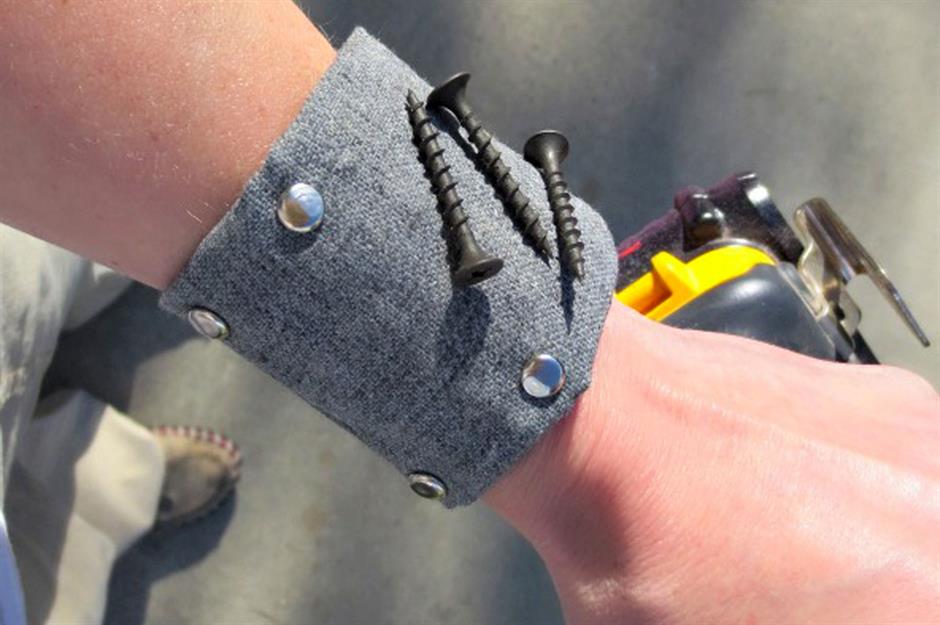
My Altered State
Using your mouth to keep nails and screws within reach is unhygienic and a tad dangerous! Why not hot-glue a magnet to your drill handle and stick your nails on there? Or, better still make a magnetic wrist band like this grey design by My Altered State that fits perfectly.
Clip a pencil onto a tape measure
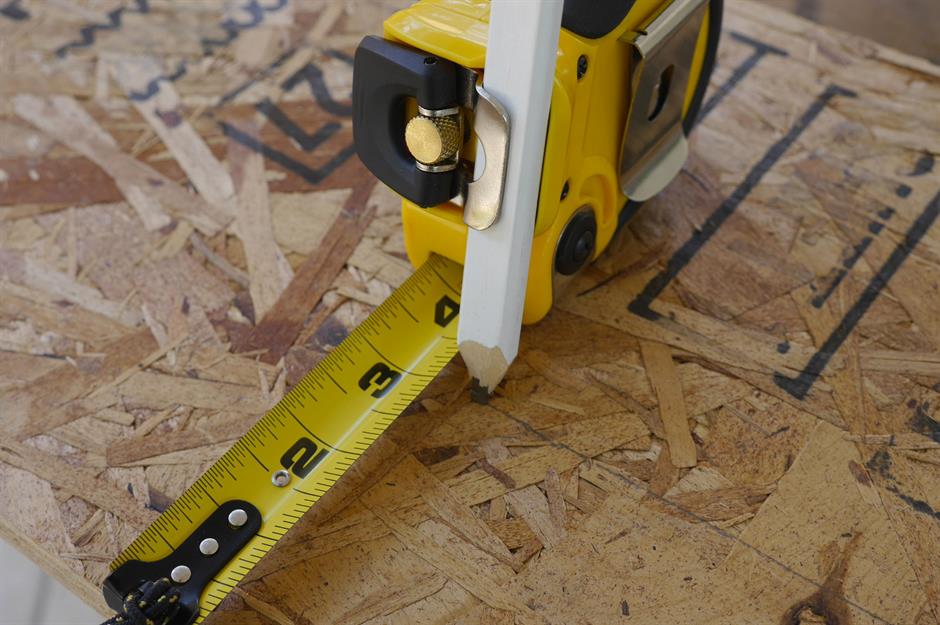
Tool Craze
DIY projects can often feel like you need two pairs of hands to get the job done. So, when working alone, hacks to help you multi-task are the key to success. Look out for a tape measure that has a pencil holder attached so you can measure and mark with ease. Or, clamp a small pencil or piece of chalk into the belt clip.
Use a rubber band for broken screws
RTA Cabinet Store
We’ve all come across a dreaded stripped screw (where a screw head is damaged so much that it is impossible to remove with a screwdriver). A simple way to remove one is to use a rubber band. Lay the band over the screw and insert the screwdriver on top. The rubber acts as a grip and fills the damaged void. RTA Cabinet Store goes into more detail on their blog.
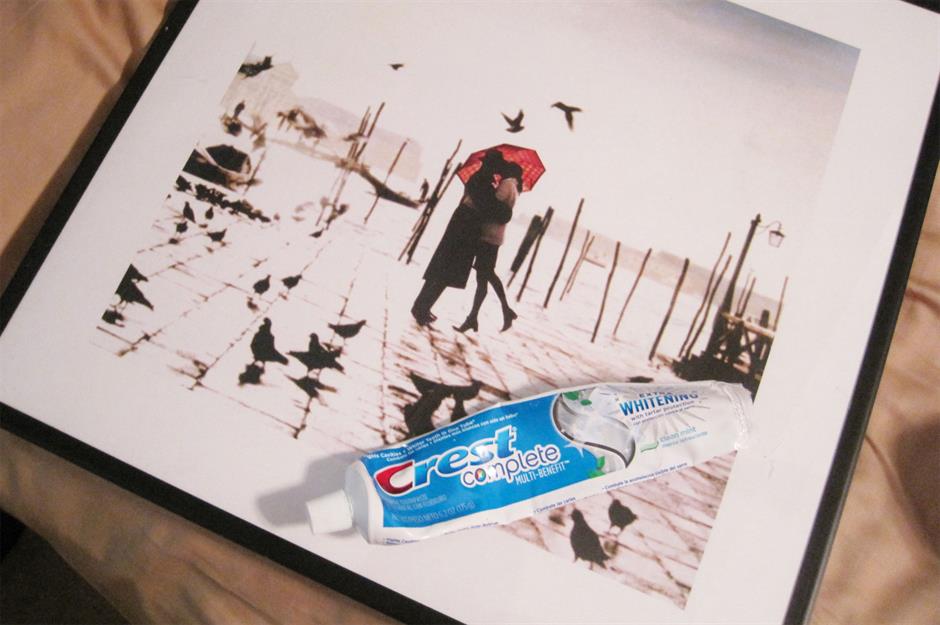
Hang frames with toothpaste
Loving Here
Take the headache out of hanging a picture frame by using everyday toothpaste. To find the perfect spot to drill in the wall, dab a blob of toothpaste on the frame where the nail needs to go, and then hold it up to touch the wall. Toothpaste will transfer onto the wall exactly where you need it. Then just wipe off the toothpaste when the nail is in place. Melissa from Loving Here has used this DIY hack for creating many gorgeous gallery walls in her home.
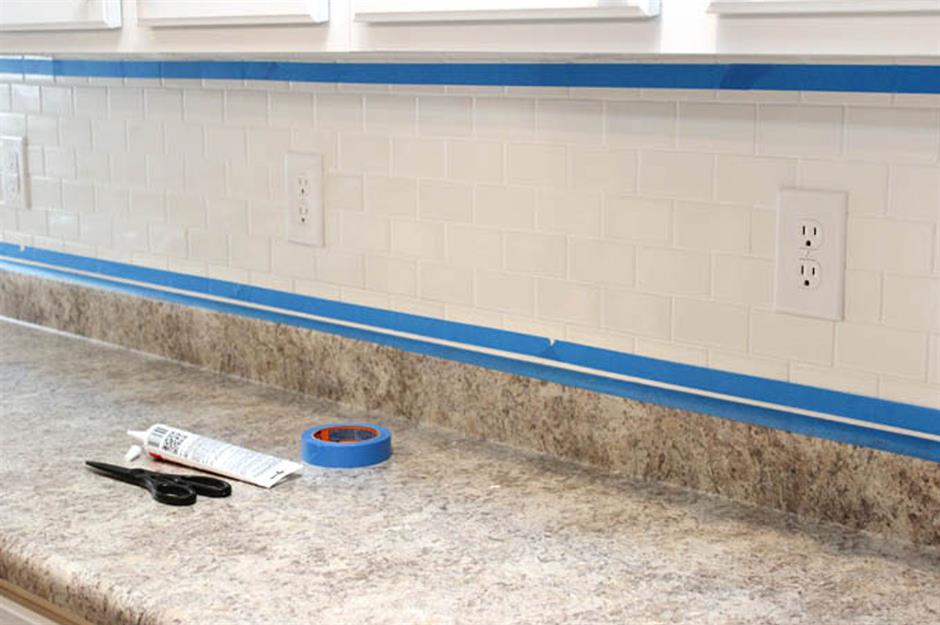
Use masking tape for caulking
How To Nest for Less
Decorators’ caulk makes grouted bathroom or kitchen wall tiles fully water-resistant around the edges. Keep the caulk line perfectly straight and clean by marking out a straight margin with your trusty painter’s tape. Squeeze the caulk along the centre of the tracks and smooth it out with your finger. Allow to dry for 10 minutes and peel off the tape for a smooth crisp waterproof sealant. Check out this method from start to finish with How To Nest For Less.
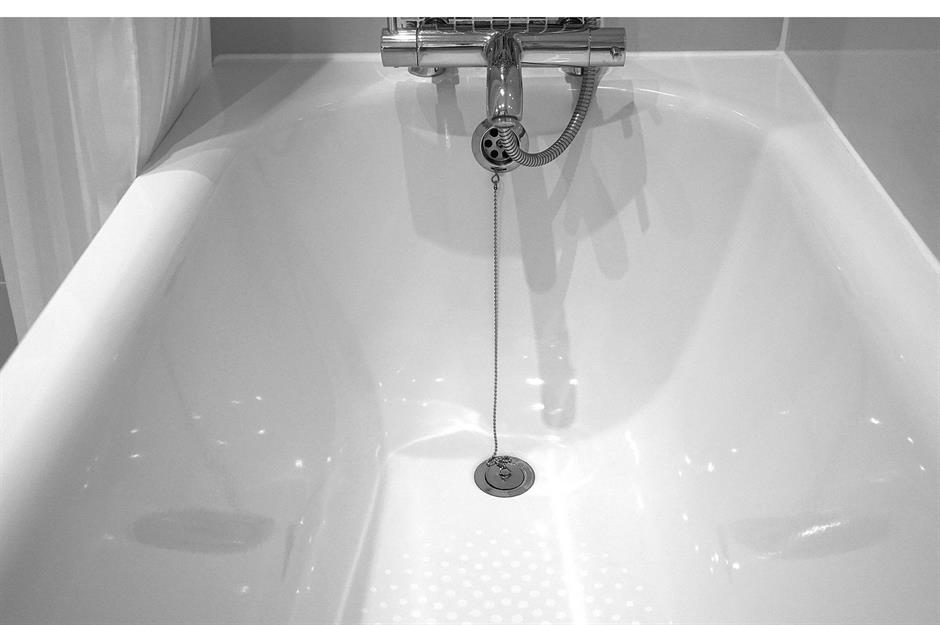
Add sealant with a filled bath
BC Profiles
Sealant is vital when installing a bath to keep the area watertight. However, DIYers can often make a big mistake when caulking the bath edge. Luckily Jon Cooper, owner of BC Profiles, has given us this tip for new and replacement sealant jobs: “When the old sealant has been removed, fill the bath with water (before laying the new). This added weight will ensure that the sealant won’t crack when the bath is used later.’ Great advice!
Use matchsticks as tile spacers
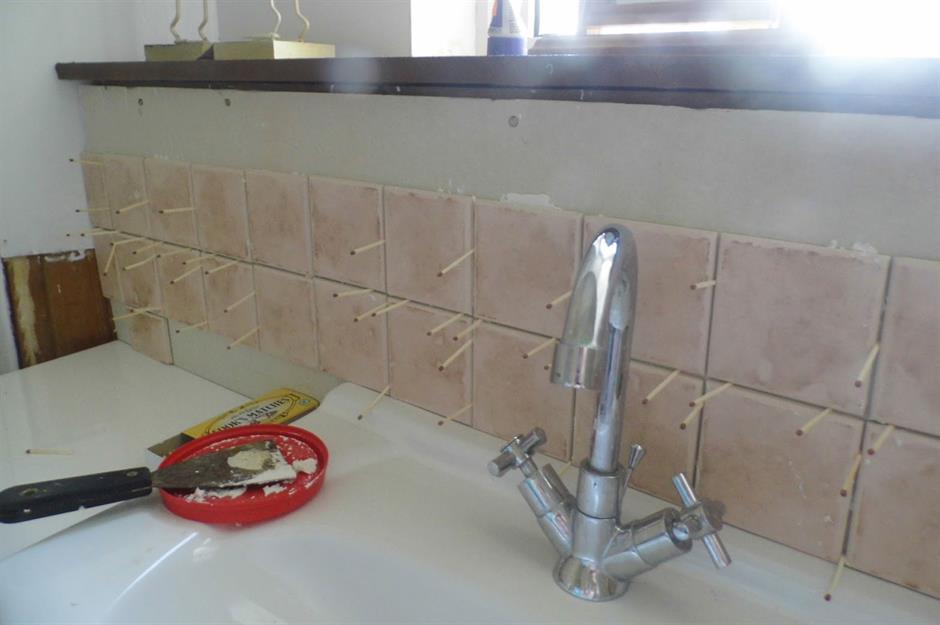
Mamas Mercantile
Tile spacers are little plastic crosses, wedges or sticks that are inserted between tiles (when being laid) to keep them an equal distance apart. Once removed they leave behind a narrow trough in which to apply grout. If you don’t have any to hand, matchsticks work too and are an effective tool for small tile jobs like this splashback by Mamas Mercantile.
Always remember your paint colours
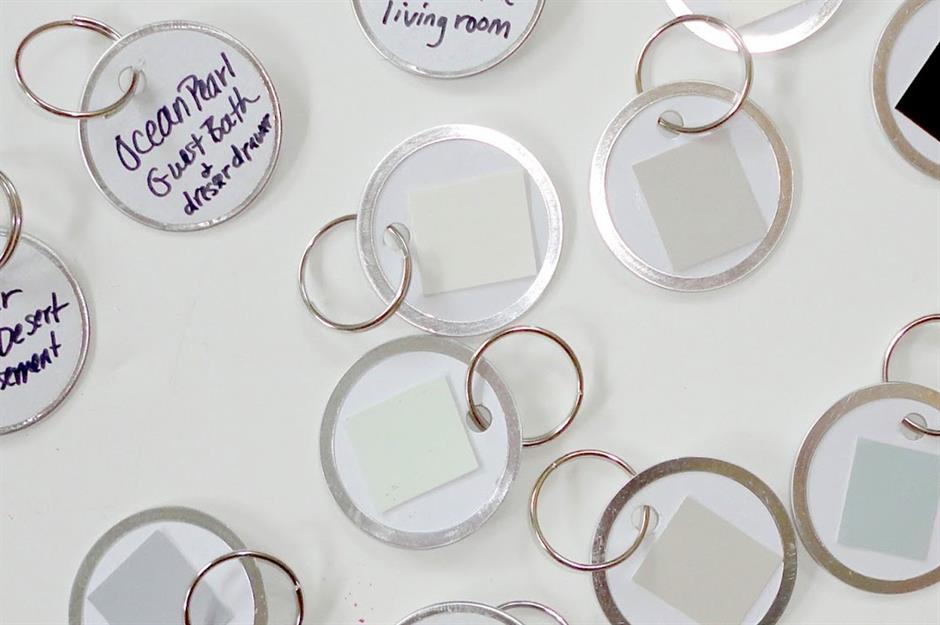
LiveLoveDIY
Planning your next paint decorating project? Remember the names of paint colours for each room in your home by making a handy keyring of colours. Cut out small squares of sample chips or cards and glue them onto key tags, then write the paint name and room on the back. Keep them together on a keyring for easy access. This idea comes from LiveLoveDIY—Virginia takes her keyring with her when she goes shopping for matching fabrics, furniture and decorative accents too.
Protect skirting boards with a paint edger
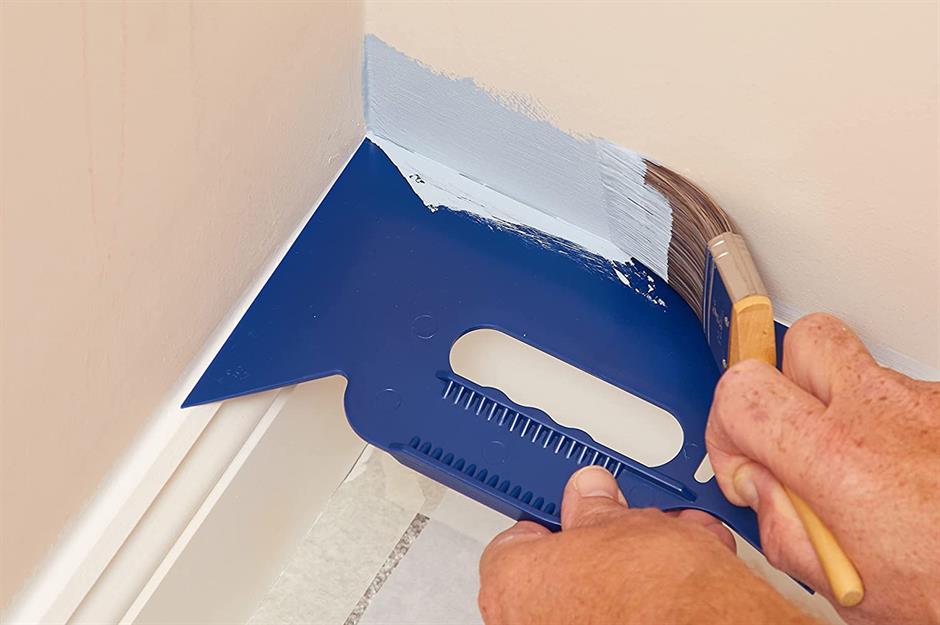
Fit For The Job / Amazon
If you are repainting existing walls or skirting boards that butt up against carpets and walls be sure to invest in a paint edger. The inexpensive handy piece of plastic or steel will protect as you go. Choose one with various curves and angles to suit all project shapes.
Use duct tape to strengthen sandpaper
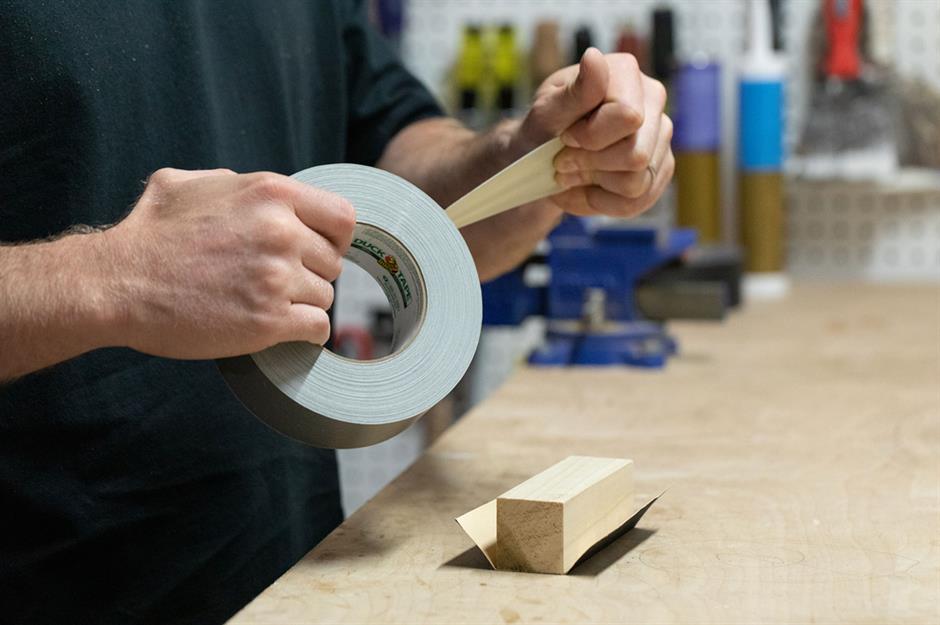
Duck Brand
Make sandpaper work twice as hard by backing it up with duct tape. Whether you are sanding freehand or using a sanding block, reinforcing the back stops the paper from tearing and helps it last longer. Add the tape to the back in strips to make sure the sandpaper is still flexible.
Lift wooden floorboards with apple cider vinegar
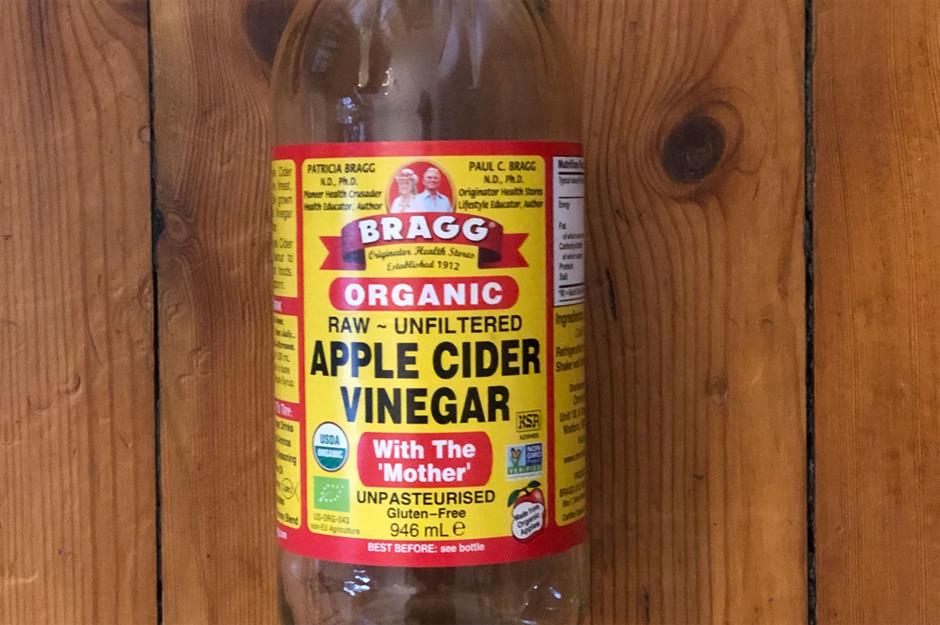
Pavilion Broadway
Restore tired period features like natural floorboards with an eco-friendly apple cider vinegar solution. Lead interior designer David Ewart from Pavilion Broadway explains: “It offers an all-natural cleaner that will also protect the finish or varnish on your flooring”. Sweep or vacuum your floor, then mix one full cup of apple cider vinegar for every five litres of warm water in a bucket. Mop or clean the floor by hand with a cloth, and make sure not to leave any excess dampness on the floorboards by gently wiping it down after.
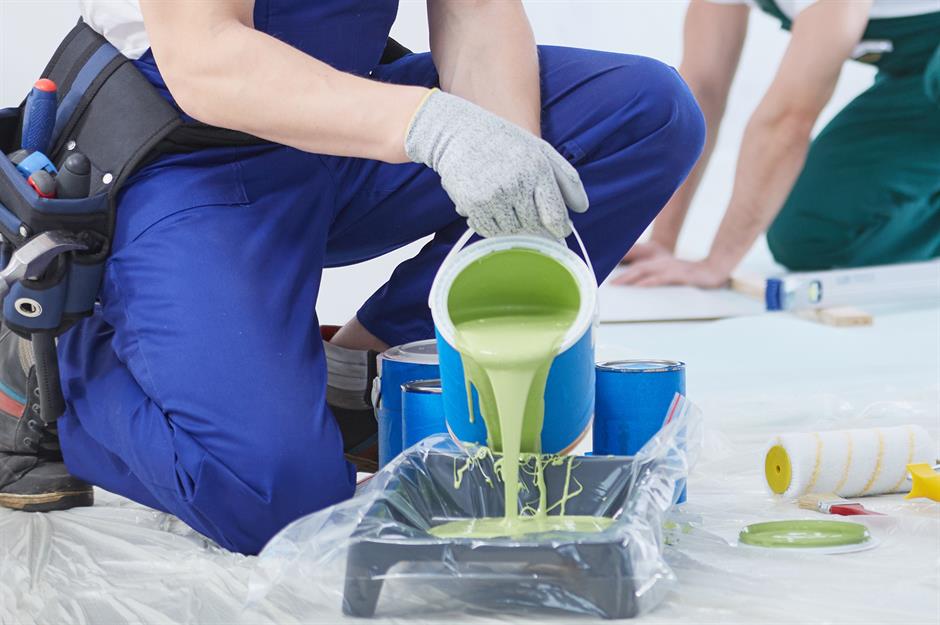
Store excess paint in mason jars
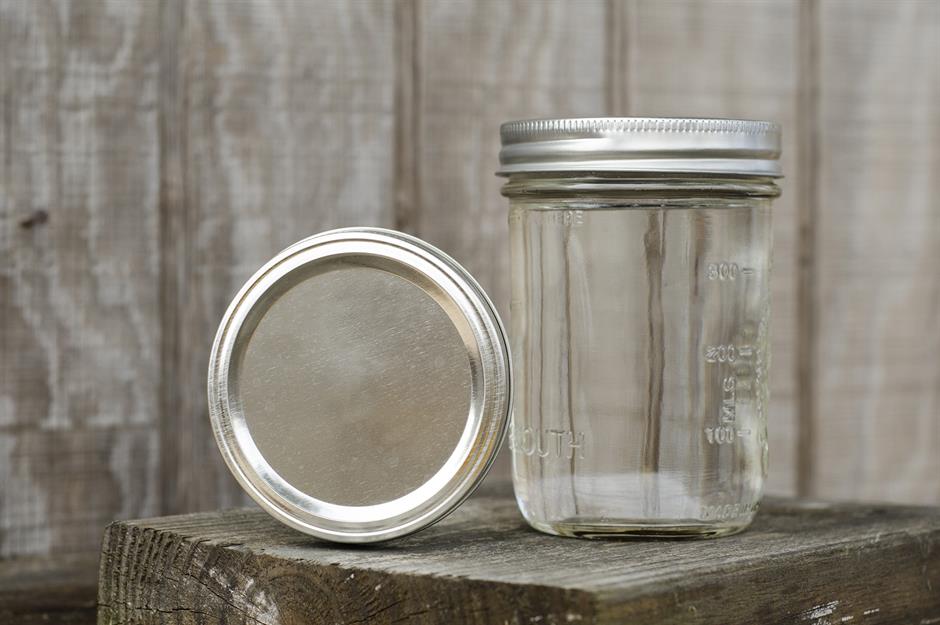
Reece with a C / Shutterstock
Changes of temperature can spoil leftover paint, so if you have any surplus after your latest project, pop it in a mason jar, rather than in the garden shed. Let’s face it, paint cans take up a lot of space in the home, so this nifty storage hack is the ideal way to keep paints handy for touch-ups without cluttering up your home.
Erase wood scratches with walnuts
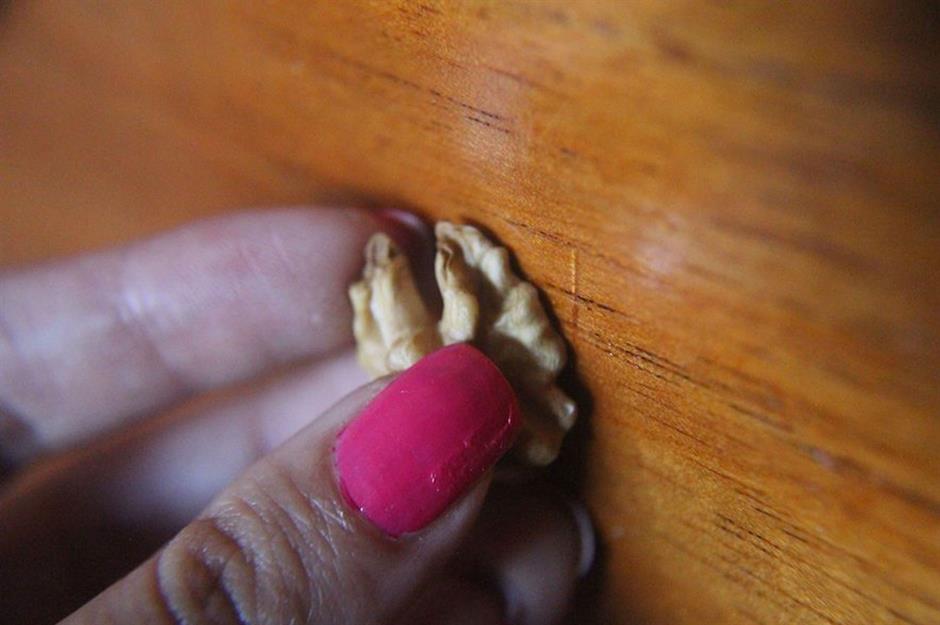
wikiHow
Have you got a few light scratches on wooden furniture? Take the natural approach and erase them with walnuts. wikiHow advises DIYers to rub the raw nut over the affected area and let the nut oil absorb into the wood. Buff with a soft clean cloth and the scratches will be sealed and gone!
Remove watermarks with toothpaste
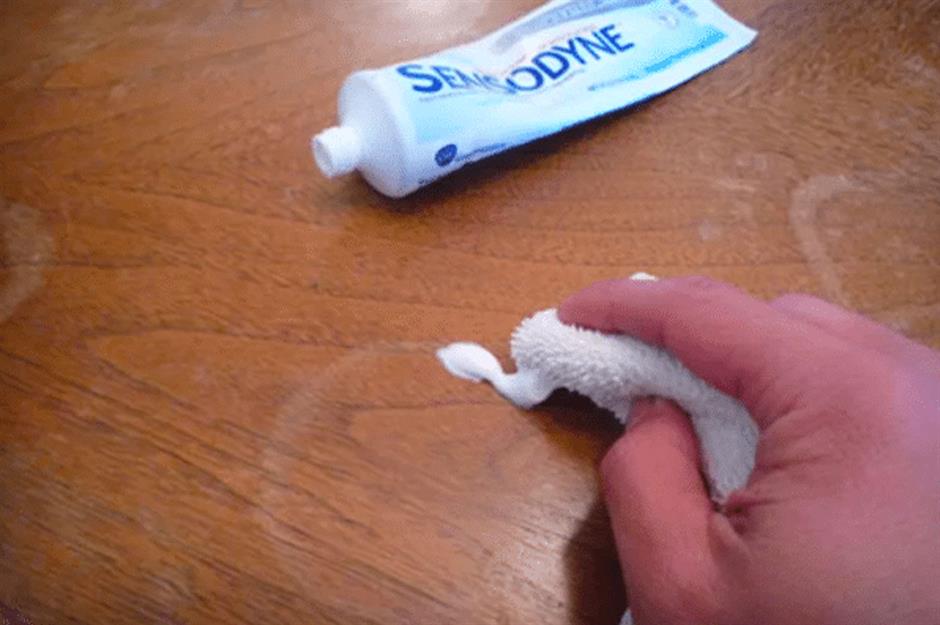
Charles + Hudson
No matter how many times you put out coasters, there’s always someone who accidentally leaves a glass directly on a wood surface, right? Stay calm as you can eliminate those water rings with toothpaste. Using white paste (not gel), dab a small blob on the area and rub gently with a cloth. Charles + Hudson have a detailed tutorial for this hack on their website, where they try out other unusual household stain removers such as mayonnaise and baking soda too!
Unstick adhesive with a hairdryer
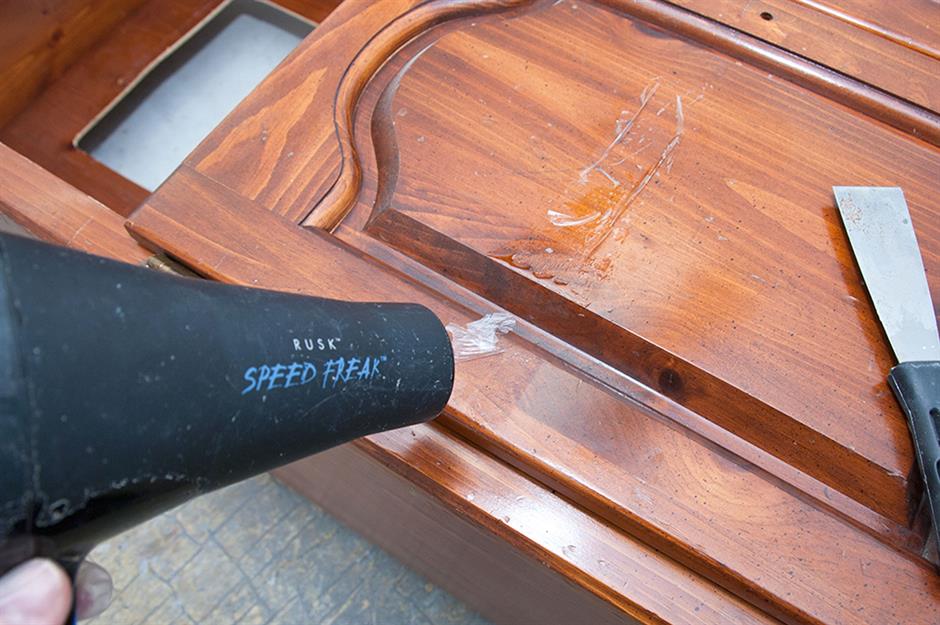
Salvaged Inspirations
Need to peel off that pricing label without leaving a sticky residue? Use the hot air from a hairdryer to melt and lift the glue. Salvaged Inspirations removed packing tape with this method when upcycling a dresser. This DIY hack also works wonders on children’s stickers that may have been ‘creatively’ added to bedroom doors or furniture without parental permission.
Remove paint with coconut oil
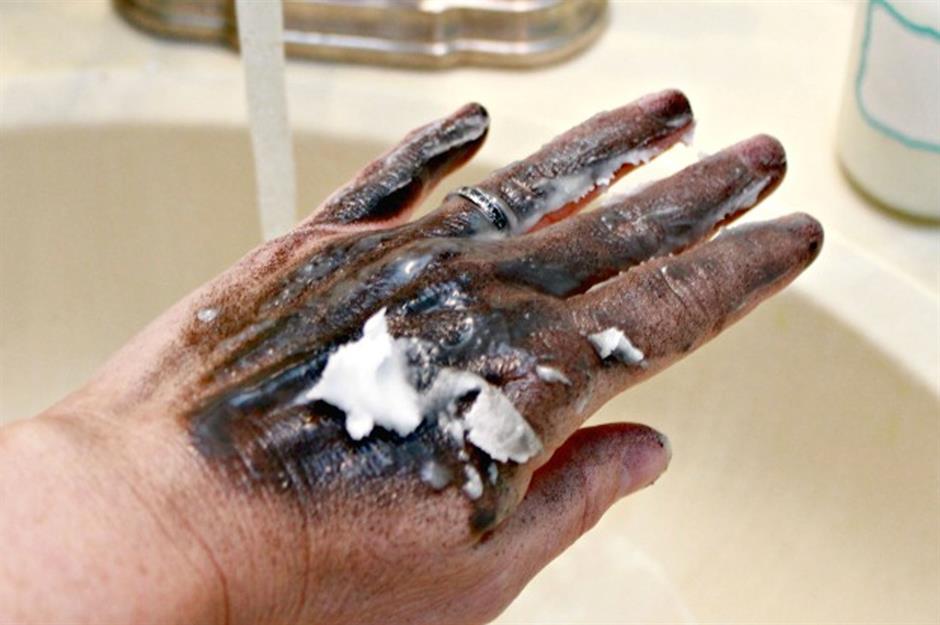
Mom 4 Real
Clean up after DIY jobs by making a natural cleaning solution that is kind to your skin. Mom 4 Real uses coconut oil, baking soda and lemon essential oil to clean spray paint off hands in a jiffy. Take a look at her blog for the full recipe and method.
Use tape to keep a drill steady
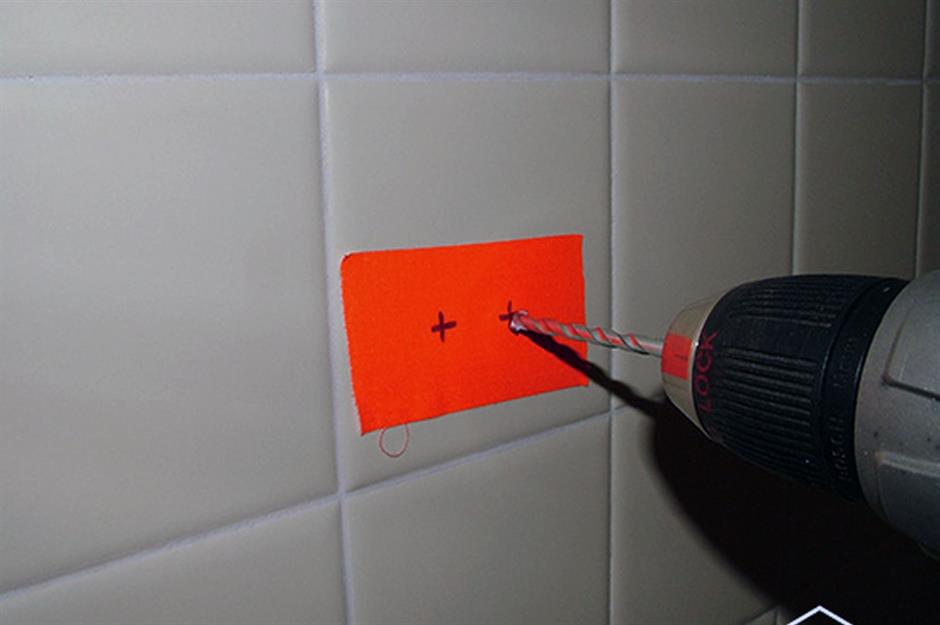
Tim Carter / Ask The Builder
Drilling onto slippery ceramic tiles can be tricky. If it goes wrong the tiles will crack and replacing one tile in a pattern is not a fun task. Ask The Builder recommends using a brand-new carbide-tipped masonry drill bit, at low speed and with light pressure. But first, mark the area you want to drill by placing duct tape over the tile as the matt surface will help control the wandering drill bit and stop it from sliding.
Turn your phone into a spirit level
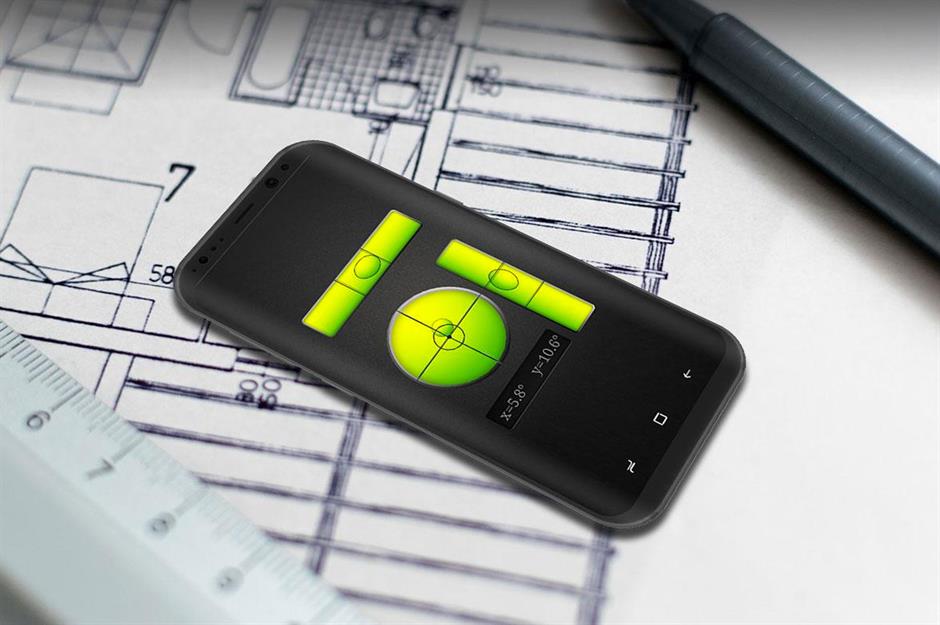
APK Pure
There’s no need for that large, chunky spirit level. Did you know an iPhone can act as a substitute level? If you have an updated IOS, go to the apps section and look for the measure app. Click on the level tab and hey presto—when the phone is level on a surface the screen turns green! If you don’t have an iPhone there are many spirit level and measuring apps such as Precise Level that can be downloaded onto other smartphones too.
Remove carpet dents with ice cubes
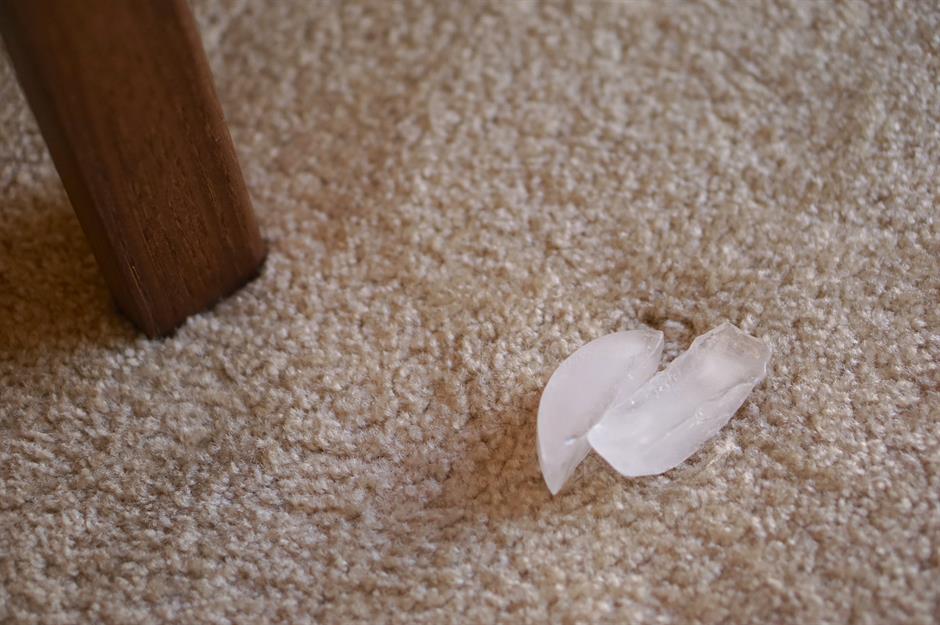
Sasima / Shutterstock
Moved furniture around during a revamp? If you’ve been left with unsightly dents in your carpet, try this hack. Lay ice cubes on the dents overnight and leave them to melt. In the morning blot any excess, and if there are any remaining dents, fluff up your carpet with a fork. Trust us, it will look as good as new!
Always use painter’s tape
Make it Yours / Rust-Oleum
Masking tape is a decorator’s toolbox essential. However, a poor-quality tape can let paint seep through leaving jagged edges. Ensure a professional finish every time by using a quality painter’s tape such as Frog Tape or Ambro Professional. They are so much more effective at reducing paint bleed and will not mark the surface when you remove it to reveal that oh-so-satisfying clean finish. For freshly painted furniture or walls, opt for a tape designed for delicate surfaces.